A story by Scott Sappenfield (not an AI robot)
block
I built an AI picture frame in just 7 days.
Before reading further, watch this 5 minute quick video to see it in action!
block
As usual
I’m doing a workshop for middle schoolers to get them excited about AI, so…
- I had an harebrained idea to give something away
- I built something, in this case hardware + software
- I realized what I built was silly (thanks family – they always keep you straight)
I can still show this off in the workshop, but now I left myself pondering what to do with it:
- do I give it away anyway?
- do I recycle it?
- do I blow it away and do something else with this gadget?
block
How a week of questionable decisions unfolded:

Day 0 – Monday
Brilliant idea strikes! 30 minutes of frantic online shopping later, I’m $200 poorer and 100% confident this will be amazing.

Day 5 – Friday
All the shiny gadgets have arrived. I arrange them on my desk like some kind of tech altar.
Day 6 & 7 – Saturday & Sunday
Success! I have created… something. Two solid days of work and more AI assistance than I care to admit.”
Ah, also btw, I give you all the hardware, software and step-by-step instructions to build this yourself. It could be a fun side project for you or someone else in your life.
block
My plan
I am still planning to give a group of middle-school-aged kiddos a presentation on AI-something. The preso is going to be say 30 minutes of me talking to middle school aged kids about artificial intelligence. You know, getting them jazzed about AI! The specifics, I’m not sure yet.
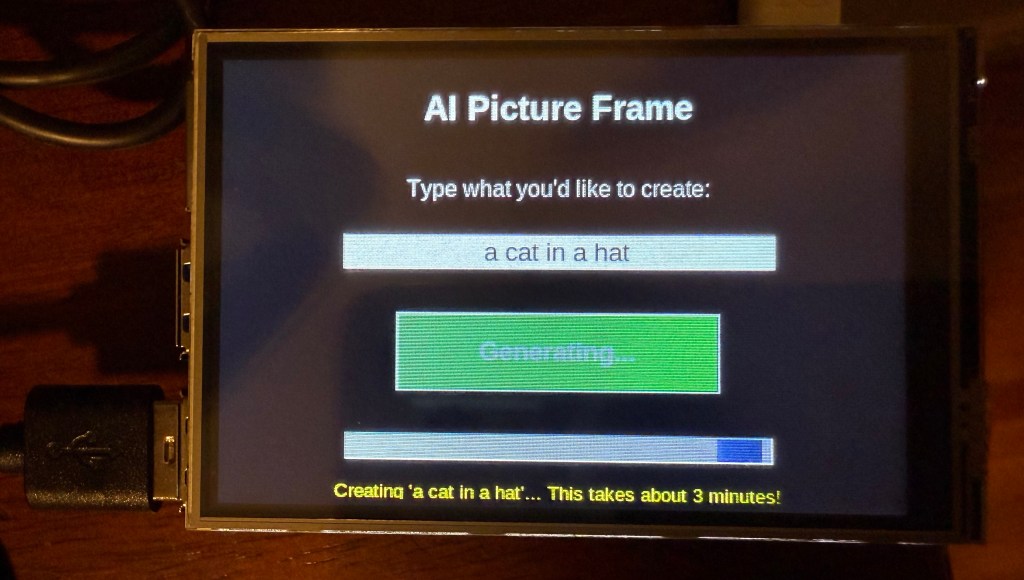
In addition to a preso they have to listen to me talk through, I wanted to give something away. Something cool and neat. So here is what I came up with: an “AI Picture Frame”. My thoughts were a lucky kid could:
- have something to hold in their hands that uses AI
- enjoy a picture frame that generates whatever image they want to show
- if they are tired of the rain, input “sunny beach”
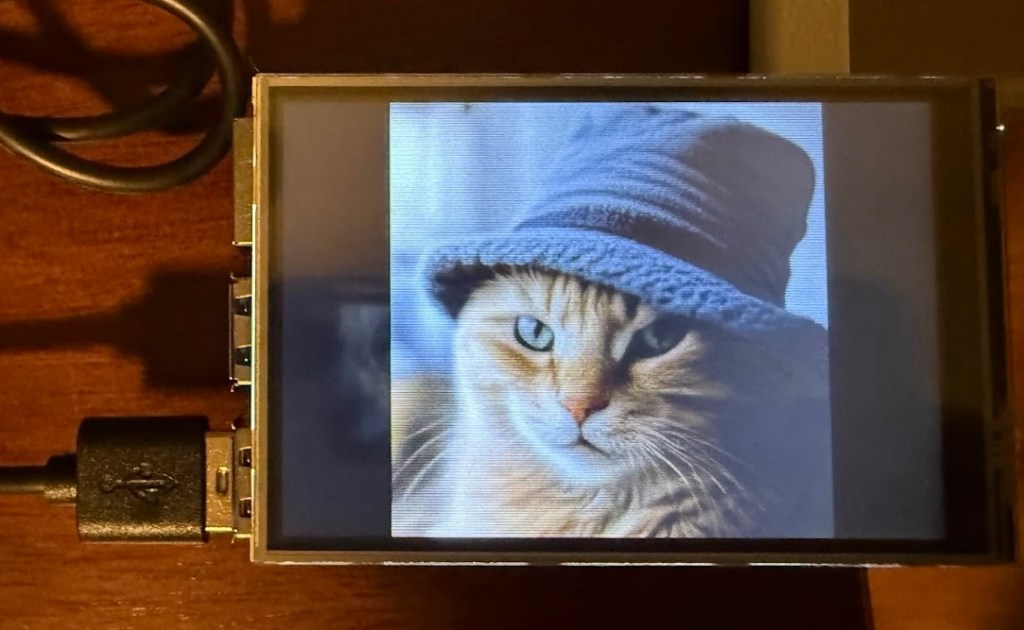
- if they are feeling silly, input “cat in a hat”
- if they are feeling extra silly, input “cat head with a dog’s body”
- use it with no WiFi needed
- plug it in – it needs a power supply and keyboard to type in an AI image generating prompt
- appreciate that it all runs on a small device, something to hold in their hand
- inspire – this is something open, in the sense that an enterprising young person could open up this black box and change it
I chose middle-schoolers because I thought, let’s face it:
- Maybe the sweet spot is middle schoolers? Maybe.
- High schoolers? Booooooring. I have to imagine that will be their reaction to me.
- Elementary schoolers? They might not be interested in what I have to say either.
My thought on the educational value was that this project demonstrates several important technology concepts:
- Edge Computing: Running AI locally instead of in the cloud
- Model Optimization: Making complex AI work on simple hardware
- Open Source AI: Using freely available, cutting-edge technology
- Hardware-Software Integration: Combining multiple technologies to create something greater than the sum of its parts
The fact that students can generate professional-quality AI images on a device that fits in their palm, using technology that was impossible just a few years ago, really showcases how rapidly AI is becoming accessible to everyone.
block
The problem
The problem is that after I built it and showed it off to my family (who looked at me with that special combination of pride and concern that only families can master), I realized they were right.
Giving a “talk” or inspiring kids is fine, but the giving away of this random AI picture frame widget was the dumb part. This imaginary “lucky kid” that I give it to is just likely going to have the reaction of “why am I listening to this guy?” and throw it in a desk drawer. It’s future will be that of a dust collector. In the rare off-chance I hit this one enterprising kid that was interested in my giveaway, well, the chances of that… A lot of my ideas have been wildly unsuccessful in the past and while I’ve had some winners (thankfully), I recognize I have weird ideas. This appears to be no exception.
What was I thinking!
block
Not much wasted time
Fortunately, not much time was wasted as it only took me about 7 calendar days from start to finish to get it done.
- Monday: ordered hardware
- Monday – Friday: received all the hardware
- Saturday/Sunday: built the AI Picture Frame
- Sunday: showed it off to my family
block
The components
With the help of AI (AI prompt: I’m creating AI image generation device (think picture frame) for middle school students using Raspberry Pi. Could you tell me what I need to buy to make this come to life?), I settled on:
- Raspberry Pi
- I hadn’t used one before and was always curious so why not give it a rip
- I knew the Pi to be a self-contained piece of hardware that can run software
- python
- I figured a Raspberry Pi could support Python and I was right
- I love Python
- LCD touchscreen
- I wanted a small screen that would show the AI generated image
- No burn-in, I want it to be able to run it a long time
- LLM
- I wanted a small LLM that could fit on a small memory footprint (to fit on this Pi)
- I wanted a LLM that could respond quickly not take hours to run on a small device
- No WiFi
- I wanted a device that didn’t require the Internet
- Reproducible
- I wanted to be able to quickly fire up any new Pi hardware and have this work without too much effort
- I wanted to be able to build and give these away often not just as a one off because it was going to be such a hit – LOL
block
Day 0
I need to buy stuff. But what? Again, I asked AI for help.
And sure enough, AI came through for me. This is what I ordered (prices are all-in including tax/shipping). It was very easy to find everything and I want to say within 30 minutes I had everything ordered online.
| Raspberry Pi 5 (8GB+) | $113.60 | PiShop.us | Item # 8GB-9028 |
| Pi 5 Active Cooler | came with the Pi | PiShop.us | Item # 374-1 |
| SD Extreme MicroSD | $11.99 | SanDisk | 64GB Extreme microSDXC UHS-I |
| 3.5″ LCD Touchscreen | $28.95 | Waveshare | 3.5inch Touch Screen, Compatible with Raspberry Pi 5/4B/3B/Zero/Zero W/Zero 2W/Pico/Pico W/Pico WH, TFT LCD, 480×320 |
| Compact USB Keyboard | $26.89 | Snpurdiri | Wired Gaming Keyboard, 61 Keys RGB Backlit Ultra-Compact Small |
| Pi 5 Power Supply | came with the Pi | PiShop.us | Item # 1244-1 27W USB-C |
| Pi 5 Case | came with the Pi | PiShop.us | Item # 1272-1 I did not realize this would not fit my LCD screen |
| HDMI to HDMI Micro adapter | $11.40 | oldboytech | For Pi to external HDMI monitor |
Grand total: $192.83 – which seemed reasonable until I realized I was essentially building a very expensive way to generate pictures of cats wearing hats.
block
Day 2 – 4
Packages started to arrive and I put them aside. In the evenings, I briefly reviewed the AI required/suggested software, but didn’t actually do anything yet.
I did make a mental decision on the software I was going to use:
- Raspberry Pi desktop GUI app for Mac (for initial flashing SD card)
- XNNPACK
- A performance optimization library created by Google
- Makes AI calculations run much faster on regular computer processors (CPUs) instead of requiring expensive graphics cards
- Think of this as Red Bull for your AI calculations. Without it, generating an image would take longer than a DMV visit. With it? 3 minutes and you’re done.
- OnnxStream
- The main application that actually generates images from text prompts
- Takes a text description (“robot cat in space”) and converts it into an actual image
- Most AI image generators need powerful computers with expensive graphics cards. OnnxStream is designed to work on smaller devices like Raspberry Pi by being very efficient with memory and processing.
- ONNX Format
- A standardized way to package AI models so they can run on different devices
- A universal file format for AI brains – like how MP3 files can play on any music player, ONNX models can run on different computers and devices.
- HuggingFace
- Like GitHub, but specifically for sharing AI models instead of code
- A huge library where researchers and companies share pre-trained AI models that anyone can download and use
- Instead of training your own AI from scratch (which would take months and cost thousands of dollars), you can download a ready-made one.
- SDXL Turbo Model
- The actual “AI brain” that learned how to create images
- What makes it special:
- SDXL = Stable Diffusion XL, a very high-quality image generation AI
- Turbo = Optimized to work in just 1 processing step instead of 50+ steps
- This makes it about 50x faster while maintaining good quality
With a prompt of “robot cat in space”:
- OnnxStream breaks down the text into mathematical concepts
- SDXL Turbo uses its learned knowledge to imagine what that should look like
- XNNPACK accelerates all the complex calculations
- The result appears as an image on the screen
This process involves billions of mathematical operations, which is why the optimization libraries are so crucial for making it work on modest hardware.
Normally, AI image generation requires:
- High-end graphics cards
- Powerful computers with lots of RAM
- Constant internet connection to cloud services
- Monthly subscription fees
This setup runs:
- On a small Raspberry Pi computer
- Completely offline
- With no ongoing costs
- In just minutes per image
block
Day 5
Everything has arrived. Let’s unpack and admire all the “cool” trinkets.
That’s it. That’s all I did for the day.
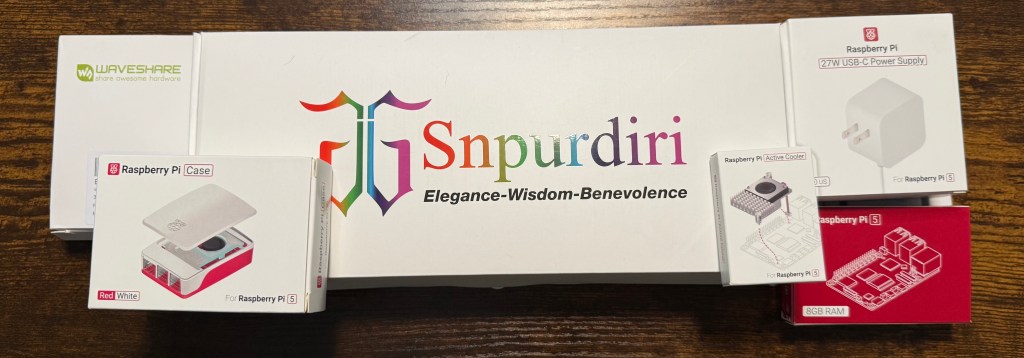
Boxed
Unboxed
block
Day 6 & 7: Where I Go From ‘This Seems Easy’ to ‘Why Did I Think This Was Easy?
Now I need to build everything!
Assemble the Pi and connect to it (using a Macbook)
Assembled Raspberry Pi 5 by taking the fan off the case and using the active cooler purchased instead. Hooked up the active cooler to the Pi. Put the Pi in the case.
Hooked up HDMI Port 1 on the Pi to the external monitor using the HDMI mini-> HDMI cable. Plugged the SD card into the macbook pro. Opened the Raspberry Pi Imager software.

Chose the following:
- device : pi 5
- OS: 64-bit
- Storage: the SD card (you have to insert it into Mac or this dropdown is blank)
Then click on “EDIT SETTINGS”
Optional settings:
- Set username password as pi/pi
- Configured WLAN and WLAN country to US
- Set locale to NYC with keyboard US
- Use SSH with password auth
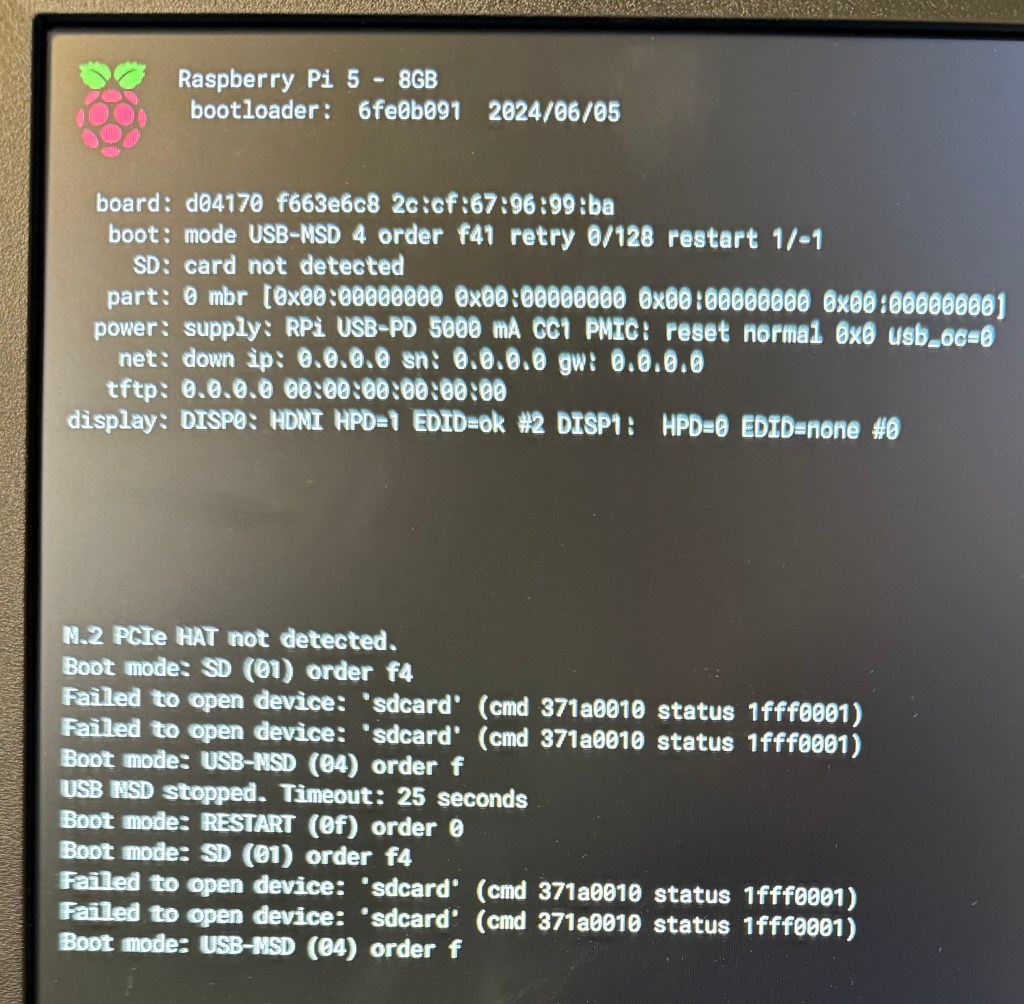
Boot up the raspberry Pi
- insert the SD card directly into the Pi’s receiving slot (on the bottom side of the motherboard)
- attach a USB keyboard
- attach an external HDMI monitor (optional – you can SSH into the device)
It is very satisfying seeing it boot up so quickly for the first time (and by satisfying, I mean the kind of nerdy excitement that makes you want to call someone, but then you realize normal people don’t get excited about boot times).
block
Quick Connection Test
Find your Pi’s IP address
# On the Pi terminal:
hostname -I
# Note this IP address (e.g., 192.168.1.100)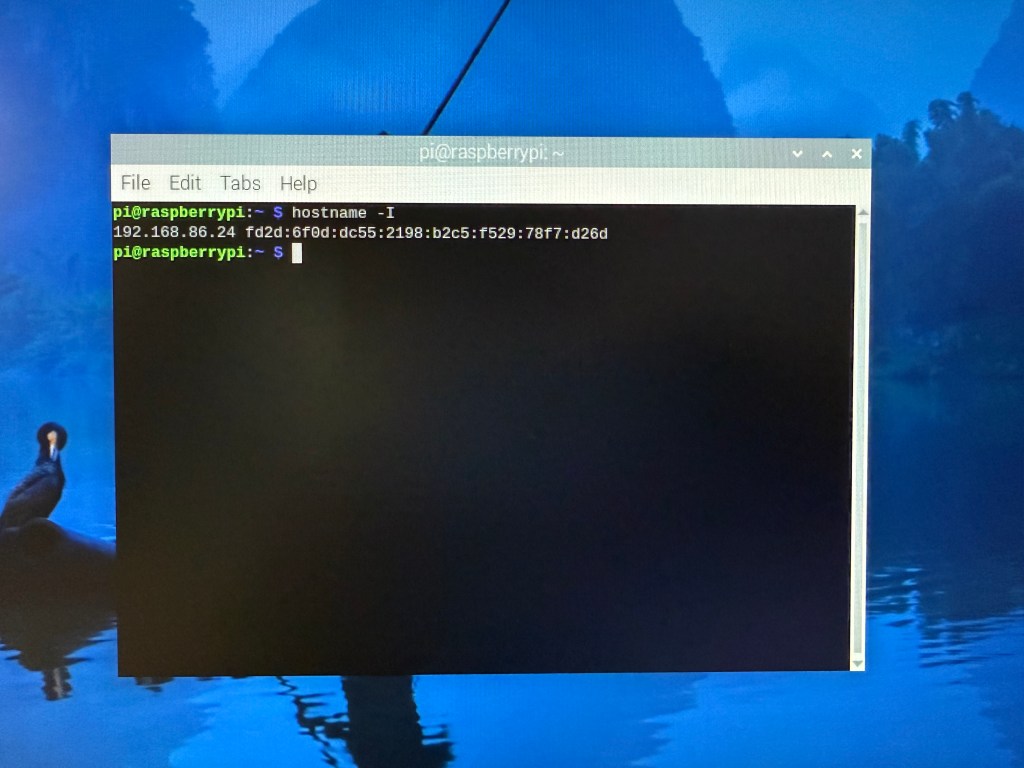
Test SSH Connection
# From your Mac terminal:
ssh pi@192.168.1.100  # Use your Pi's actual IP

# If connection works, you'll see Pi's command prompt
# Test basic commands:
ls
pwd
python3 --version
Test File Transfer
# From Mac, copy a test file to Pi:
echo "Hello from Mac" > ~/Desktop/test.txt
scp ~/Desktop/test.txt pi@192.168.1.XXX:~/

# Verify on Pi:
ssh pi@192.168.1.XXX
cat ~/test.txt  # Should show "Hello from Mac"
block
Build OnnxStream on Pi
Okay, here’s where we get into the weeds. Don’t worry if this looks like gibberish – even I had to ask AI what some of these commands actually do:
Phase A: Install Dependencies
# SSH into Pi from your Mac:
ssh pi@192.168.1.XXX

# Run these commands ON THE PI:
sudo apt update && sudo apt upgrade -y
sudo apt install -y cmake git build-essential git-lfs
git lfs install
Phase B: Create Working Directory
# Still on Pi via SSH:
mkdir ~/ai-image-gen
cd ~/ai-image-gen
export baseDir=$(pwd)
echo $baseDir  # Should show /home/pi/ai-image-gen
Phase C: Build XNNPACK (30 minutes of your life you’ll never get back, but hey, at least you’ll have VERY fast AI math)
# On Pi – this takes time, be patient:
git clone https://github.com/google/XNNPACK.git
cd XNNPACK
git checkout 1c8ee1b68f3a3e0847ec3c53c186c5909fa3fbd3
mkdir build
cd build
cmake -DXNNPACK_BUILD_TESTS=OFF -DXNNPACK_BUILD_BENCHMARKS=OFF ..
cmake --build . --config Release
Phase D: Download AI Model
# Back to base directory on Pi:
cd $baseDir
# Ensure stable internet:
git clone --depth=1 https://huggingface.co/AeroX2/stable-diffusion-xl-turbo-1.0-onnxstream
Phase E: Build OnnxStream
# On Pi:
cd $baseDir
git clone https://github.com/vitoplantamura/OnnxStream.git
cd OnnxStream/src
mkdir build
cd build
cmake -DMAX_SPEED=ON -DXNNPACK_DIR=$baseDir/XNNPACK ..
cmake --build . --config Release
Phase F: First Test
# Navigate to model directory and download all files:
cd ~/ai-image-gen/stable-diffusion-xl-turbo-1.0-onnxstream
git lfs pull

# OnnxStream expects files in specific location – copy them there:
mkdir -p ~/ai-image-gen/stable-diffusion-xl-turbo-1.0-onnxstream/stable-diffusion-xl-turbo
cp ~/ai-image-gen/stable-diffusion-xl-turbo-1.0-onnxstream/sdxl_unet_fp16/* ~/ai-image-gen/stable-diffusion-xl-turbo-1.0-onnxstream/stable-diffusion-xl-turbo/
cp ~/ai-image-gen/stable-diffusion-xl-turbo-1.0-onnxstream/sdxl_vae_decoder_fp16/* ~/ai-image-gen/stable-diffusion-xl-turbo-1.0-onnxstream/stable-diffusion-xl-turbo/

# Test image generation on Pi:
cd ~/ai-image-gen/OnnxStream/src/build/
./sd --turbo \
    --models-path ~/ai-image-gen/stable-diffusion-xl-turbo-1.0-onnxstream \
    --prompt "robot cat in space" \
    --steps 1 \
    --output first_test.png \
    --rpi \
    --not-tiled
View Result on Mac
# From Mac, copy the generated image:
scp pi@192.168.1.XXX:~/ai-image-gen/OnnxStream/src/build/first_test.png ~/Desktop/

# Open on Mac:
open ~/Desktop/first_test.png
block
Connect LCD and create auto-start Python program
Connect and Configure LCD Display
# Power off Pi safely:
sudo shutdown -h now

# Connect 3.5" Waveshare XPT2046 touchscreen to GPIO pins
# Power back on and SSH in
Edit Boot Configuration
# Edit boot configuration:
sudo nano /boot/firmware/config.txt
Add these lines at the end:
# Disable HDMI (force LCD as primary)
hdmi_ignore_hotplug=1
hdmi_blanking=1

# LCD Configuration
dtparam=spi=on
dtoverlay=waveshare35a
framebuffer_width=480
framebuffer_height=320
framebuffer_depth=16

# Force console to use LCD
fbcon=map:10

# GPU memory split for better performance
gpu_mem=128
Configure X Server for LCD
# Create X11 configuration directory:
sudo mkdir -p /usr/share/X11/xorg.conf.d/

# Create LCD display configuration:
sudo nano /usr/share/X11/xorg.conf.d/99-fbdev.conf
Add this content:
Section "Device"
    Identifier "fbdev"
    Driver "fbdev"
    Option "fbdev" "/dev/fb0"
    Option "ShadowFB" "off"
EndSection

Section "Screen"
    Identifier "Primary Screen"
    Device "fbdev"
    DefaultDepth 16
    SubSection "Display"
        Depth 16
        Modes "480x320"
    EndSubSection
EndSection

Section "ServerLayout"
    Identifier "Default Layout"
    Screen "Primary Screen"
EndSection
Create Auto-Start Desktop Script
# Create startup script:
sudo nano /usr/local/bin/start-lcd-desktop
Add this content:
#!/bin/bash
echo "Starting LCD Desktop..." > /tmp/lcd-debug.log
date >> /tmp/lcd-debug.log

# Wait for system to be ready
sleep 5

# Start X server on LCD
sudo X :0 -config /usr/share/X11/xorg.conf.d/99-fbdev.conf &
X_PID=$!
echo "X server started, PID: $X_PID" >> /tmp/lcd-debug.log

# Wait for X to start
sleep 3

# Start minimal desktop environment
export DISPLAY=:0
sudo -u pi XDG_RUNTIME_DIR=/run/user/1000 DISPLAY=:0 openbox &
sleep 2
sudo -u pi XDG_RUNTIME_DIR=/run/user/1000 DISPLAY=:0 pcmanfm --desktop &

# Wait for desktop to settle
sleep 3

# Start the AI Picture Frame application
sudo -u pi XDG_RUNTIME_DIR=/run/user/1000 DISPLAY=:0 python3 /home/pi/ai_picture_frame.py &

echo "Picture frame app started" >> /tmp/lcd-debug.log
Make it executable:
sudo chmod +x /usr/local/bin/start-lcd-desktopCreate System Service
# Create systemd service:
sudo nano /etc/systemd/system/lcd-desktop.service
Add this content:
[Unit]
Description=LCD Desktop
After=multi-user.target
Wants=multi-user.target

[Service]
Type=simple
ExecStart=/usr/local/bin/start-lcd-desktop
Restart=no
RemainAfterExit=yes

[Install]
WantedBy=multi-user.target
Enable the service:
sudo systemctl daemon-reload
sudo systemctl enable lcd-desktop
sudo systemctl disable lightdm
Install Picture Frame Application
# Install required Python libraries:
sudo apt install python3-pil python3-pil.imagetk -y

# Create the picture frame application (or SSH it from Mac):
nano /home/pi/ai_picture_frame.py

# Copy the complete Python application code from the AI Picture Frame Application artifact.
Github link to ai_picture_frame.py
Test the app:
sudo -u pi XDG_RUNTIME_DIR=/run/user/1000 DISPLAY=:0 python3 /home/pi/ai_picture_frame.py &
Calibrate Touch Screen
# Install calibration tool:
sudo apt install xinput-calibrator -y

# Run calibration (follow on-screen instructions):
sudo -u pi XDG_RUNTIME_DIR=/run/user/1000 DISPLAY=:0 xinput_calibrator

# Save calibration output to:
sudo nano /usr/share/X11/xorg.conf.d/99-touchscreen-calibration.conf
Test Complete System
# Reboot to test everything:
sudo reboot

# Should automatically show:
# 1. LCD display as primary (no HDMI needed)
# 2. Picture frame application interface
# 3. Properly calibrated touch
# 4. Working AI image generation
block
Create a master image
I want to be able to repeat all this quickly and using a SD card that is pre-built with all of this on it seems the way to go!
Prepare Pi for Imaging
# SSH to Pi for final cleanup:
ssh pi@192.168.1.XXX

# Clean temporary files:
sudo apt clean
sudo apt autoremove -y
rm -rf ~/.cache/*
# Clear any test images
rm /home/pi/ai-pictures/current_image.png 2>/dev/null || true
# Shutdown Pi properly:
sudo shutdown -h now
Create Master Image File
# Remove SD card from Pi, insert into Mac
diskutil list
# Find your SD card (e.g., /dev/disk4)

# Unmount but don't eject:
diskutil unmountDisk /dev/disk4

# Create compressed master image:
sudo dd if=/dev/rdisk4 bs=1m status=progress | gzip > ~/Desktop/AI-Project/master-images/pi5_ai_master.img.gz

# Once it's completed you can eject it
diskutil eject /dev/disk4
Test Master Image
# Flash master image to NEW SD card:# Put in new blank SD card into Macdiskutil unmountDisk /dev/disk4
gunzip -c ~/Desktop/AI-Project/master-images/pi5_ai_master.img.gz | sudo dd of=/dev/rdisk4 bs=1m status=progress

# Once it's completed you can eject it
diskutil eject /dev/disk4
block
The Grand Reveal (Or: How to Impress Exactly Nobody)
Mission accomplished! I now own a fully functional AI picture frame that can generate any image I want in under 3 minutes. It’s basically magic in a tiny screen.
[Insert dramatic pause for effect]
So… now what?
What I Actually Learned (Besides Humility):
- Raspberry Pi mastery: Turns out these little computers are way less scary than I thought
- AI is a surprisingly good teacher: Who knew it had gotten that much better in 6 months? My robot overlord patiently walked me through the hard stuff
- Two screens are dumb: I spent way too much time juggling between my LCD and external monitor. Pro tip: just SSH in and save yourself the headache
- Sometimes the journey IS the destination: Even if nobody wants my AI picture frame, I had a blast building it
Back to the drawing board with a clean slate.

